|
|
|
This addon depends on several libraries, and you have to install at least some
|
|
|
|
of them in order to use Sverchok-Extra. If you do not need all features, you
|
|
|
|
may install only one or two of libraries, but you have to install at least
|
|
|
|
something, otherwise Sverchok-Extra will just do nothing.
|
|
|
|
|
|
|
|
One thing you will have to install anyway if you want to use Sverchok-Extra is
|
|
|
|
[pip][6]. All libraries are installed with it.
|
|
|
|
|
|
|
|
### Simple dependencies installation UI
|
|
|
|
|
|
|
|
Some of dependencies can be installed easily, by just running `pip`. For such
|
|
|
|
dependencies, Sverchok-Extra supports easy-to-use installation user interface.
|
|
|
|
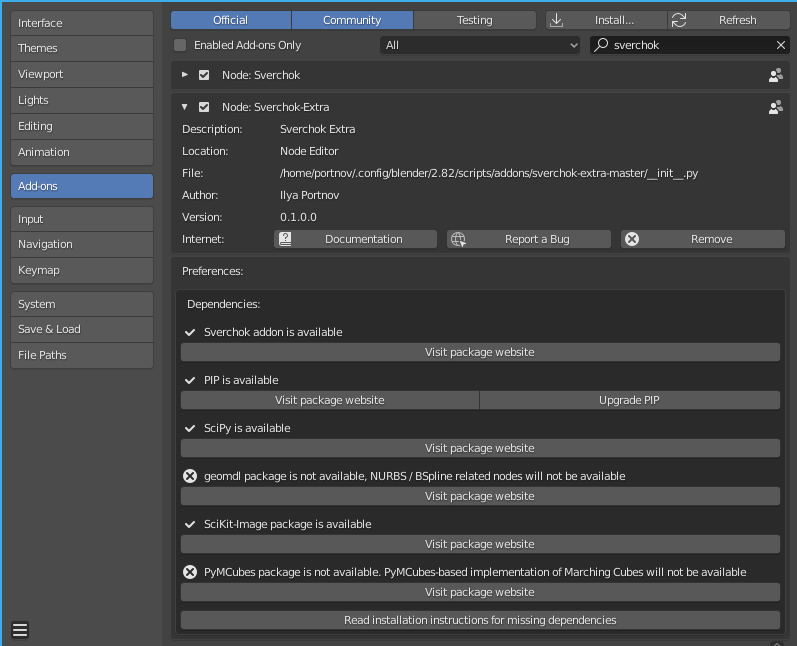
To use it, navigate to Edit => Preferences, then locate Sverchok-Extra
|
|
|
|
preferences under Addons section:
|
|
|
|
|
|
|
|
|
|
|
|
|
|
|
|
The dialog shows current status of all dependencies. For dependencies that can
|
|
|
|
be installed by `pip`, but are not yet installed, this dialog will show an
|
|
|
|
"Install" button. You'll have just to press the button and wait for when
|
|
|
|
Blender will say that the library is installed. If there will be any errors
|
|
|
|
during installation, Blender will report it and print details into console
|
|
|
|
output.
|
|
|
|
|
|
|
|
For dependencies that can not be installed that easily, the dialog contains a
|
|
|
|
button which opens the browser on an official web site of corresponding
|
|
|
|
library, so you can find installation instructions.
|
|
|
|
|
|
|
|
The following sections of this document will be useful if you can not install
|
|
|
|
the library by pressing the button. For libraries that can not be that easily
|
|
|
|
installed by `pip`, this document contains only short instructions. Please
|
|
|
|
refer to web sites of corresponding libraries for complete instructions and
|
|
|
|
support.
|
|
|
|
|
|
|
|
All commands provided in this document are for Linux-based systems. For Windows
|
|
|
|
and MacOS, commands may differ a bit, but the general idea will be the same.
|
|
|
|
|
|
|
|
### Install pip
|
|
|
|
|
|
|
|
In some cases, it may appear that Blender's python already knows about your
|
|
|
|
system's installation of python (python is usually installed by default on most
|
|
|
|
Linux distros). In such cases, you may use just `pip install something` to
|
|
|
|
install libraries.
|
|
|
|
|
|
|
|
There are two known ways to install `pip` into Blender.
|
|
|
|
|
|
|
|
#### Option 1
|
|
|
|
|
|
|
|
This I tested on latest Blender 2.81 builds. The similar instructions should
|
|
|
|
work for other Blender 2.8x versions.
|
|
|
|
|
|
|
|
$ /path/to/blender/2.xx/python/bin/python3 -m ensurepip
|
|
|
|
$ /path/to/blender/2.xx/python/bin/python3 -m pip install --upgrade pip setuptools wheel
|
|
|
|
|
|
|
|
(exact name of `python` executable depends on specific blender build).
|
|
|
|
|
|
|
|
#### Option 2
|
|
|
|
|
|
|
|
If, for some reason, Option 1 does not work for you (on some system Python says
|
|
|
|
`no module named ensurepip`), then you have to do the following:
|
|
|
|
|
|
|
|
1. Download [get-pip.py][13] script
|
|
|
|
2. Run it with Blender's python:
|
|
|
|
|
|
|
|
$ /path/to/blender/2.xx/python/bin/python3.7m /path/to/get-pip.py
|
|
|
|
|
|
|
|
Please refer to [official pip site][14] for official installation instructions.
|
|
|
|
|
|
|
|
### Install SciPy
|
|
|
|
|
|
|
|
$ /path/to/blender/2.xx/python/bin/python3.7m -m pip install -U scipy
|
|
|
|
|
|
|
|
### Install SciKit-Image
|
|
|
|
|
|
|
|
$ /path/to/blender/2.xx/python/bin/python3.7m -m pip install -U scikit-image
|
|
|
|
|
|
|
|
### Install Circlify
|
|
|
|
|
|
|
|
$ /path/to/blender/2.xx/python/bin/python3.7m -m pip install -U circlify
|
|
|
|
|
|
|
|
### Install PyMCubes
|
|
|
|
|
|
|
|
This is more complex. First, you have to install [Cython][7]:
|
|
|
|
|
|
|
|
$ /path/to/blender/2.xx/python/bin/python3 -m pip install Cython
|
|
|
|
|
|
|
|
Then you have to set up a build environment for Cython. You will need 1) to
|
|
|
|
install development files for Python (such as `Python.h` and others), and 2) to
|
|
|
|
explain Blender's python where to find them. **Note**: you have to have headers
|
|
|
|
for exactly the same version of Python that your Blender build is using.
|
|
|
|
|
|
|
|
On Debian/Ubuntu, you can install Python's development files by `apt-get
|
|
|
|
install libpython3.7-dev` for `python3.7m` used in Blender 2.80/2.81. On other
|
|
|
|
Linux distros, the command will be similar. On Windows or MacOS this can be
|
|
|
|
more tricky, I did not try.
|
|
|
|
|
|
|
|
You have to somehow tell Blender's built-in python where to look for headers.
|
|
|
|
I've found the simplest way is to do
|
|
|
|
|
|
|
|
$ ln -s /usr/include/python3.7m/* /path/to/blender/2.xx/python/include/python3.7m/
|
|
|
|
|
|
|
|
There may be more correct way, but I do not know it.
|
|
|
|
|
|
|
|
After that, you can install PyMCubes by
|
|
|
|
|
|
|
|
$ /path/to/blender/2.xx/python/bin/python3.7m -m pip install -U PyMCubes
|
|
|
|
|
|
|
|
### Install Geomdl
|
|
|
|
|
|
|
|
In the simplest case, you can install Geomdl by
|
|
|
|
|
|
|
|
$ /path/to/blender/2.xx/python/bin/python3.7m -m pip install -U geomdl
|
|
|
|
|
|
|
|
but this way you will get pure-python library, which is very slow. If you want
|
|
|
|
it fast, then you have to install Cython (see previous paragraph for
|
|
|
|
instruction). After you installed Cython, you can install "cythonized" geomdl
|
|
|
|
as it is described in [Geomdl instruction][9]:
|
|
|
|
|
|
|
|
$ /path/to/blender/2.xx/python/bin/python3 -m pip install geomdl --install-option="--use-cython"
|
|
|
|
|